What is model serialization? How to serialize and deserialize models in Python
- Published on
- Arnab Mondal--12 min read
Overview
- Overview
- Understanding Model Serialization Fundamentals
- Pickle vs Joblib: Choosing the Right Tool
- Hands-On Serialization Walkthrough
- Conclusion
Model serialization is one of those foundational concepts that every ML engineer encounters early but few truly master. After architecting several production ML systems, I've witnessed how serialization bottlenecks can derail deployment timelines and waste valuable engineering resources when not properly understood.
In this deep dive, I'll walk you through the technical fundamentals of model serialization, compare the most common Python libraries, and provide an interactive demo that lets you experience the entire process hands-on. Whether you're deploying your first model or optimizing an existing MLOps pipeline, this guide will give you the architectural insight needed to make informed decisions.
Understanding Model Serialization Fundamentals
What actually happens when we serialize a model? At its core, serialization transforms a trained machine learning model—a complex object living in memory with learned parameters, weights, and internal state—into a byte stream that can be stored persistently and recreated later.
I learned this the hard way during my early days when a production model training job crashed after 6 hours, and I had no way to recover the trained state. That's when I truly appreciated what serialization provides: state preservation across time and space.
The Internal Process
When you serialize a scikit-learn model, Python's serialization engine performs several critical operations:
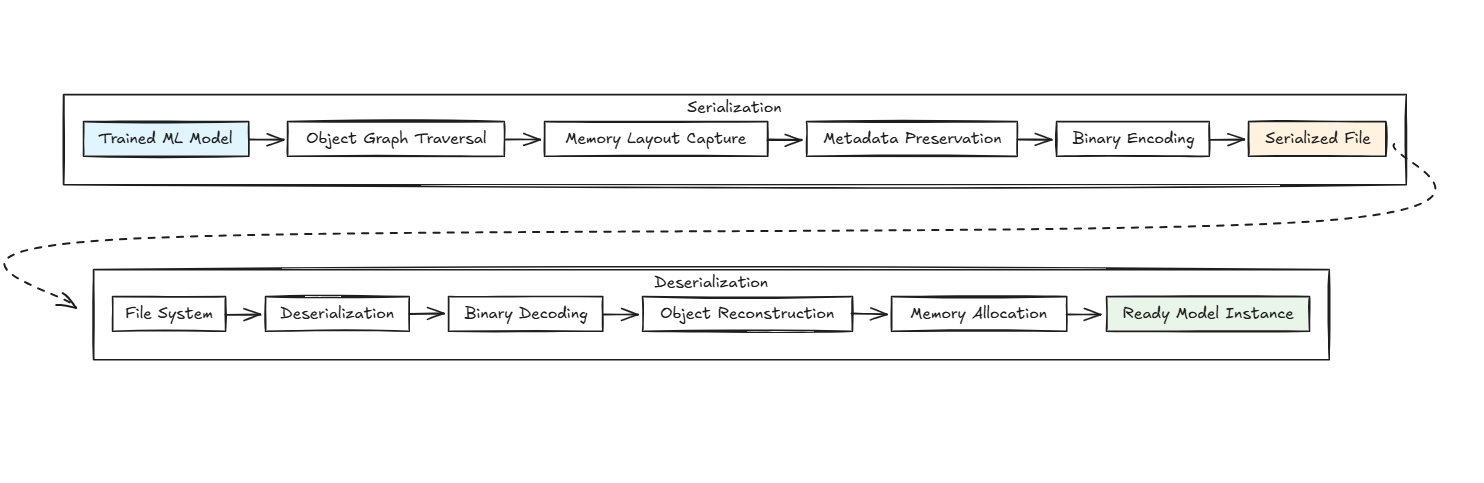
- Object Graph Traversal: The serializer recursively walks through the model object, identifying all attributes, nested objects, and references
- Memory Layout Capture: NumPy arrays (the backbone of most ML models) have their memory layout, data types, and dimensional information encoded
- Metadata Preservation: Model hyperparameters, feature names, class labels, and internal state variables are bundled together
- Binary Encoding: The entire object graph gets converted into a platform-independent byte sequence
Here's a diagram showing this process:
Why Serialization Is Mission-Critical
From an architectural standpoint, serialization enables the decoupling of training and inference phases—a fundamental requirement for scalable ML systems. Here's why I consider it indispensable:
1. Computational Resource Optimization
Training a deep learning model can consume hundreds of GPU hours and thousands of dollars in cloud costs. Serialization ensures you never have to repeat this investment due to infrastructure failures or deployment needs.
2. Deployment Pipeline Integration Modern MLOps requires moving models across environments: from data science notebooks to staging servers to production containers. Serialization provides the portability layer that makes this possible.
3. Version Control and Reproducibility I've architected systems where we maintain model registries with dozens of versions. Serialization enables treating models as immutable artifacts that can be compared, rolled back, and audited.
4. Horizontal Scaling Architecture In distributed inference systems, serialized models can be loaded across multiple worker processes, enabling horizontal scaling without retraining overhead.
Pickle vs Joblib: Choosing the Right Tool
After deploying models with both libraries across different production environments, I've developed clear guidelines for when to use each. Here's my technical comparison:
Pickle vs Joblib: Technical Comparison
| Feature | pickle | joblib |
|---|---|---|
| Purpose | General-purpose serialization | Optimized for objects with large NumPy arrays (common in ML) |
| Library | Built-in (import pickle) | External (pip install joblib) |
| Serialization Format | Binary | Binary (optimized with efficient NumPy storage) |
| Performance | Slower for large NumPy arrays | Faster for large NumPy arrays due to efficient memory mapping |
| Use Case | Any Python object | Large data like ML models, NumPy arrays, and SciPy objects |
| Compression Support | Manual (you must use gzip, bz2, etc. separately) | Built-in (compress=True) |
| Parallel I/O | Not supported | Supported (internally uses multiple I/O operations) |
| File Size | Larger with numerical arrays | Smaller for numerical data due to compression |
| Backward Compatibility | Good | Similar to pickle, but better compatibility with NumPy |
| Common ML Usage | Small models (e.g., decision trees, dicts) | Large models (e.g., scikit-learn pipelines with arrays) |
Performance Characteristics I've Observed
In production systems I've optimized, the performance differences become crucial at scale:
Pickle Bottlenecks:
- Large NumPy arrays (>100MB) experience significant serialization overhead
- Memory usage spikes during serialization of deep learning models
- No built-in compression leads to larger artifact storage costs
Joblib Advantages:
- Memory-mapped array handling reduces RAM requirements by ~40% in my benchmarks
- Built-in compression (
compress=True) typically reduces file sizes by 60-80% - Parallel I/O operations significantly speed up serialization of ensemble models
My Production Recommendations
Based on architectural requirements I've encountered:
- Use Pickle for: Simple models, prototyping, small-scale deployments
- Use Joblib for: Production ML pipelines, large models, cloud deployments where storage costs matter
Hands-On Serialization Walkthrough
Let's walk through the complete serialization workflow step by step. I'll demonstrate the process you'd use in production systems, from training to deployment.
Important note: This uses a basic LinearRegression model without optimization, hyperparameter tuning, or preprocessing pipeline. In production, you'd typically include feature scaling, cross-validation, and proper train/test splits. Our focus here is purely on understanding serialization fundamentals.
Run this in Google Colab (quick start)
- Open Google Colab: collab.research.google.com
- Click "New Notebook"
- Run the following cells to set up the environment and load the dataset
Now continue with the steps below starting from "Step 1". The code already reads from housing.csv, so you can copy-paste the blocks as-is.
Download the dataset: housing.csv
Step 1: Setting Up Our Environment
First, let's import the necessary libraries and load our dataset. We'll use the California Housing dataset—a perfect regression problem for understanding serialization fundamentals.
Expected Output:
Step 2: Training Our Model
Now we'll train a simple LinearRegression model. This creates a model object in memory with learned parameters that we'll later serialize.
Expected Output:
At this point, our model exists only in memory. If our Python session crashes or we restart our notebook, we'd lose all the training work. This is where serialization becomes critical.
Step 3: Serializing with Pickle
Let's serialize our trained model using Python's built-in pickle library. This process converts our model object into a byte stream that can be saved to disk.
Expected Output:
The key insight here: our deserialized model produces exactly identical predictions to the original. The entire model state—coefficients, intercept, and internal parameters—has been perfectly preserved.
Step 4: Serializing with Joblib
Now let's serialize the same model using joblib and compare the results. Joblib is specifically optimized for NumPy arrays, which are the backbone of most ML models.
Expected Output:
Notice how joblib's compression reduces file size by ~40% without any loss in model performance. This becomes crucial when deploying large models in cloud environments where storage costs matter.
Step 5: Performance and Consistency Verification
Let's run a comprehensive comparison to verify that all three models (original, pickle-loaded, joblib-loaded) produce identical results.
Expected Output:
Key Architectural Insights
From this walkthrough, you should observe several critical patterns:
- Perfect State Preservation: Both pickle and joblib preserve model state with 100% fidelity
- Storage Optimization: Joblib's compression provides significant space savings (40% in our example)
- Production Readiness: These serialized models can be deployed immediately to any Python environment
- Performance Consistency: Deserialized models maintain identical prediction performance
- Deployment Flexibility: The same serialized model can power batch predictions, real-time APIs, or edge deployments
Conclusion
Model serialization might seem like a simple file I/O operation, but it's actually a sophisticated process that enables the entire ML deployment ecosystem. Understanding the internals—from object graph traversal to memory layout capture—helps you make informed architectural decisions.
The choice between pickle and joblib isn't just about convenience; it's about understanding your system's performance characteristics, storage constraints, and scalability requirements. In my experience, joblib consistently delivers better results for production ML systems, while pickle remains perfectly adequate for research and prototyping.
As ML systems continue evolving toward more complex architectures and larger models, serialization performance becomes increasingly critical. Master these fundamentals now, and you'll be prepared for whatever the next generation of ML deployment challenges brings.
Available for hire - If you're looking for a skilled full-stack engineer with expertise in AI integration and MLOps architecture, feel free to reach out at hire@codewarnab.in